Monday, 15 April 2013
JavaTips
We can use Java.util.regex pakage to validate any form fields in server side
It is having two packages
1.java.util.regex.Matcher;
2.java.util.regex.Pattern;
Example :
public class UsernameValidator{
private Pattern pattern;
private Matcher matcher;
private static final String USERNAME_PATTERN = "^[a-z0-9_-]{3,15}$";
public UsernameValidator(){
pattern = Pattern.compile(USERNAME_PATTERN);
}
/**
* Validate username with regular expression
* @param username username for validation
* @return true valid username, false invalid username
*/
public boolean validate(final String username){
matcher = pattern.matcher(username);
return matcher.matches();
}
}
This class validate the user name based on the pattern of regular expressions
this pattern will compile and initialize using constructor using compile method of the pattern class
then write a metod which validate your username and return true or false based on the the pattern
this method create the matcher object then this object will compare the using mateches method then return the boolean values
/***********************************************************JDBC ************************************************************************************/
/********************************connecting to database code ******************/
Class.forName("com.mysql.jdbc.Driver");
Connection conn = null;
conn = DriverManager.getConnection("jdbc:mysql://hostname:port/dbname","username", "password");
conn.close();
/********************************connecting to database code ******************/
/***********************************************************JDBC & Statement*********************************************************/
/********************************Create statement ******************/
The “Statement” interface is used to execute a simple SQL statement with no parameters. For create, insert, update or delete statement, uses “Statement.executeUpdate(sql)“; select query, uses “Statement.executeQuery(sql)“.
Statement statement = dbConnection.createStatement();
// execute create SQL stetement
statement.execute(createTableSQL);
Statement statement = dbConnection.createStatement();
// execute the insert SQL stetement
statement.executeUpdate(insertTableSQL);
Statement statement = dbConnection.createStatement();
// execute the update SQL stetement
statement.executeUpdate(updateTableSQL);
Statement statement = dbConnection.createStatement();
// execute the delete SQL stetement
statement.executeUpdate(deleteTableSQL);
String selectTableSQL = "SELECT USER_ID, USERNAME from DBUSER";
Statement statement = dbConnection.createStatement();
ResultSet rs = statement.executeQuery(selectTableSQL);
while (rs.next()) {
String userid = rs.getString("USER_ID");
String username = rs.getString("USERNAME");
}
//batch update statement
dbConnection.setAutoCommit(false);
statement = dbConnection.createStatement();
statement.addBatch(insertTableSQL1);
statement.addBatch(insertTableSQL2);
statement.addBatch(insertTableSQL3);
statement.executeBatch();
dbConnection.commit();
/********************************Create statement ******************/
/********************************JDBC & PreparedStatement ******************/
The “PreparedStatement” interface is extended “Statement”, with extra feature to send a pre-compiled SQL statement with parameters. For create, insert, update or delete statement, uses “PreparedStatement.executeUpdate(sql)“; select query, uses “PreparedStatement.executeQuery(sql)“.
PreparedStatement preparedStatement = dbConnection.prepareStatement(createTableSQL);
// EXECUTE CREATE SQL stetement
preparedStatement.executeUpdate();
/************************************************************************************/
String insertTableSQL = "INSERT INTO DBUSER"
+ "(USER_ID, USERNAME, CREATED_BY, CREATED_DATE) VALUES"
+ "(?,?,?,?)";
PreparedStatement preparedStatement = dbConnection.prepareStatement(insertTableSQL);
preparedStatement.setInt(1, 11);
preparedStatement.setString(2, "guru");
preparedStatement.setString(3, "system");
preparedStatement.setTimestamp(4, getCurrentTimeStamp());
// execute insert SQL stetement
preparedStatement .executeUpdate();
String updateTableSQL = "UPDATE DBUSER SET USERNAME = ? WHERE USER_ID = ?";
PreparedStatement preparedStatement = dbConnection.prepareStatement(updateTableSQL);
preparedStatement.setString(1, "newValue");
preparedStatement.setInt(2, 1001);
// execute insert SQL stetement
preparedStatement .executeUpdate();
String deleteSQL = "DELETE DBUSER WHERE USER_ID = ?";
PreparedStatement preparedStatement = dbConnection.prepareStatement(deleteSQL);
preparedStatement.setInt(1, 1001);
// execute delete SQL stetement
preparedStatement.executeUpdate();
tring selectSQL = "SELECT USER_ID, USERNAME FROM DBUSER WHERE USER_ID = ?";
PreparedStatement preparedStatement = dbConnection.prepareStatement(selectSQL);
preparedStatement.setInt(1, 1001);
ResultSet rs = preparedStatement.executeQuery(selectSQL );
while (rs.next()) {
String userid = rs.getString("USER_ID");
String username = rs.getString("USERNAME");
}
dbConnection.setAutoCommit(false);//commit trasaction manually
String insertTableSQL = "INSERT INTO DBUSER"
+ "(USER_ID, USERNAME, CREATED_BY, CREATED_DATE) VALUES"
+ "(?,?,?,?)";
PreparedStatement = dbConnection.prepareStatement(insertTableSQL);
preparedStatement.setInt(1, 101);
preparedStatement.setString(2, "guru01");
preparedStatement.setString(3, "system");
preparedStatement.setTimestamp(4, getCurrentTimeStamp());
preparedStatement.addBatch();
preparedStatement.setInt(1, 102);
preparedStatement.setString(2, "guru102");
preparedStatement.setString(3, "system");
preparedStatement.setTimestamp(4, getCurrentTimeStamp());
preparedStatement.addBatch();
preparedStatement.executeBatch();
dbConnection.commit();
/********************************JDBC & PreparedStatement ******************/
Sunday, 27 January 2013
Just Reminder
Uploading files with Liferay
This is a short tutorial for those of you who want to upload a file using Liferay portlets. First you need to give your form in your JSP the correct encoding type:
- <form name="<portlet:namespace/>fm" method="post" enctype="multipart/form-data" action="<portlet:actionURL />">
This makes sure that the data you upload is really uploaded. Next you should add the upload button like this :
- <input type="file" name="<portlet:namespace/>yourfile" id="<portlet:namespace/>yourfile" />
That´s all in the JSP. If you now add the following in your processAction method, you have access to your uploaded file:
- public void processAction(ActionRequest request, ActionResponse response)throws PortletException, IOException {
- UploadPortletRequest uploadRequest = PortalUtil.getUploadPortletRequest(request);
- String sourceFileName = uploadRequest.getFileName("yourfile");
- File file = uploadRequest.getFile("yourfile");
How to get the JournalStructure data
- JournalArticle article = JournalArticleLocalServiceUtil.getArticle(21623);
- Document document = SAXReaderUtil.read(article.getContentByLocale(Locale.ENGLISH.toString()));
- Node node = document.selectSingleNode("/root/dynamic-element[@name='Text1']/dynamic-content");
- String value = node.getText();
If
you create a WebContent that is based on a structure / template
combination and you want to get the value of one of the structure
fields programmatically, you can do it like this:
Imagine, that your WebContent has the ID 21623 and you are looking for a field that has the name "Text1".
Imagine, that your WebContent has the ID 21623 and you are looking for a field that has the name "Text1".
get Request Parameters in your JSP
You have a link to a portlet site
that expects a request parameter.
Example: http://localhost:8080/web/guest/page?customer=JohnDoe
How do you get the customer name in your JSP ? Just use this:
PortalUtil.getOriginalServletRequest(request).getParameter("customer" )
How do you get the customer name in your JSP ? Just use this:
PortalUtil.getOriginalServletRequest(request).getParameter("customer" )
Spring MVC portlet Liferay 6.1
We will now create a small Employee Registration portlet using Spring 3.1 with Liferay 6.1.
- We need Spring-specific JAR files, you can download Spring 3.1 release JAR files from Spring source website (http://www.springsource.org/download).
- Create a Liferay Plugin Portlet in Eclipse. Add the JARs files in WEB-INF/lib directory of the project structure. Below is the Spring Portlet Project Structure. Where you can see the WEB-INF/lib with required JARs for the portlet

service.xml
01 | <?xml version="1.0" encoding="UTF-8"?> |
02 | <!DOCTYPE service-builder PUBLIC "-//Liferay//DTD Service Builder 6.1.0//EN" |
04 | <service-builder package-path="com.navin.example.liferay"> |
05 | <author>NavinAgarwal</author> |
06 | <namespace>emp</namespace> |
07 | <entity name="Employee" local-service="true" remote-service="true"> |
08 | <!-- PK fields --> |
09 | <column name="employeeId" type="long" primary="true" id-type="identity"/> |
10 | <!-- Audit fields --> |
11 | <column name="companyId" type="long" /> |
12 | <column name="userId" type="long" /> |
13 | <column name="firstName" type="String" /> |
14 | <column name="lastName" type="String" /> |
15 | <column name="eMail" type="String" /> |
16 | <column name="phoneNo" type="String" /> |
17 | |
18 | <!-- Order --> |
19 | <order by="asc"> |
20 | <order-column name="firstName" /> |
21 | </order> |
22 | <!-- Finder methods --> |
23 | <finder name="firstNameCollection" return-type="Collection"> |
24 | <finder-column name="firstName" /> |
25 | </finder> |
26 | </entity> |
27 | </service-builder> |
Build the service.xml and the service and other imple Classes and interfaces will be generated.
Create the EmployeePortlet-context.xml file inside WEB-INF/context/portlet/employee/ folder structure. and paste the below code.
01 | <?xml version="1.0" encoding="UTF-8"?> |
02 | <beans xmlns="http://www.springframework.org/schema/beans" |
03 | xmlns:xsi="http://www.w3.org/2001/XMLSchema-instance" |
04 | xmlns:context="http://www.springframework.org/schema/context" |
05 | xmlns:tx="http://www.springframework.org/schema/tx" |
06 | xsi:schemaLocation=" |
13 | |
14 | <context:component-scan base-package="com.navin.example.action.EmployeeController" /> |
15 | <bean id="portletModeHandlerMapping" |
16 | class="org.springframework.web.portlet.handler.PortletModeHandlerMapping"> |
17 | <property name="portletModeMap"> |
18 | <map> |
19 | <entry key="view"> |
20 | <ref bean="EmployeeController" /> |
21 | </entry> |
22 | </map> |
23 | </property> |
24 | </bean> |
25 | <bean id="EmployeeController" class="com.navin.example.action.EmployeeController" /> |
26 | <bean id="viewResolver" |
27 | class="org.springframework.web.servlet.view.InternalResourceViewResolver"> |
28 | <property name="viewClass" |
29 | value="org.springframework.web.servlet.view.InternalResourceView" /> |
30 | <property name="prefix" value="/html/employee/" /> |
31 | <property name="suffix" value=".jsp" /> |
32 | </bean> |
33 | </beans> |
Now create the applicationContext.xml file inside WEB-INF/context/ . In applicationContext.xml we are not mentioning anything now. Since, we are not doing any configuration of any database and declaring and beans.
01 | <?xml version="1.0" encoding="UTF-8"?> |
02 | <beans xmlns="http://www.springframework.org/schema/beans" |
03 | xmlns:xsi="http://www.w3.org/2001/XMLSchema-instance" |
04 | xmlns:context="http://www.springframework.org/schema/context" |
05 | xmlns:tx="http://www.springframework.org/schema/tx" |
06 | xsi:schemaLocation=" |
13 |
14 | </beans> |
Now WEB.xml . In web.xml we need to write the ViewRendererServlet Class for the ViewRendererServlet servlet mapping.
01 | <?xml version="1.0" encoding="UTF-8"?> |
02 | <web-app id="WebApp_ID" version="2.4" |
03 | xmlns="http://java.sun.com/xml/ns/j2ee" |
04 | xmlns:xsi="http://www.w3.org/2001/XMLSchema-instance" |
05 | xsi:schemaLocation="http://java.sun.com/xml/ns/j2ee http://java.sun.com/xml/ns/j2ee/web-app_2_4.xsd"> |
06 |
07 | <display-name>EmployeeExample-portlet</display-name> |
08 | <servlet> |
09 | <servlet-name>ViewRendererServlet</servlet-name> |
10 | <servlet-class>org.springframework.web.servlet.ViewRendererServlet</servlet-class> |
11 | <load-on-startup>1</load-on-startup> |
12 | </servlet> |
13 | |
14 | <servlet-mapping> |
15 | <servlet-name>ViewRendererServlet</servlet-name> |
16 | <url-pattern>/WEB-INF/servlet/view</url-pattern> |
17 | </servlet-mapping> |
18 |
19 | <jsp-config> |
20 | <taglib> |
21 | <taglib-uri>http://java.sun.com/portlet_2_0</taglib-uri> |
22 | <taglib-location>/WEB-INF/tld/liferay-portlet.tld</taglib-location> |
23 | </taglib> |
24 | </jsp-config> |
25 | </web-app> |
Portlet.xml here we have to mention the portlet class name org.springframework.web.portlet.DispatcherPortlet.
And the contextConfigLocation Value which is /WEB-INF/context/portlet/employee/EmployeePortlet-context.xml
01 | <?xml version="1.0"?> |
02 |
03 | <portlet-app xmlns="http://java.sun.com/xml/ns/portlet/portlet-app_2_0.xsd" |
04 | xmlns:xsi="http://www.w3.org/2001/XMLSchema-instance" |
05 | xsi:schemaLocation="http://java.sun.com/xml/ns/portlet/portlet-app_2_0.xsd |
06 | http://java.sun.com/xml/ns/portlet/portlet-app_2_0.xsd" version="2.0"> |
07 | |
08 | <portlet> |
09 | <portlet-name>employeedetails</portlet-name> |
10 | <display-name>Employee Details</display-name> |
11 | <portlet-class>org.springframework.web.portlet.DispatcherPortlet</portlet-class> |
12 | <init-param> |
13 | <name>contextConfigLocation</name> |
14 | <value>/WEB-INF/context/portlet/employee/EmployeePortlet-context.xml</value> |
15 | </init-param> |
16 | <expiration-cache>0</expiration-cache> |
17 | <supports> |
18 | <mime-type>text/html</mime-type> |
19 | <portlet-mode>view</portlet-mode> |
20 | </supports> |
21 | <portlet-info> |
22 | <title>Employee Details</title> |
23 | <short-title>Employee Details</short-title> |
24 | <keywords></keywords> |
25 | </portlet-info> |
26 | <security-role-ref> |
27 | <role-name>administrator</role-name> |
28 | </security-role-ref> |
29 | <security-role-ref> |
30 | <role-name>guest</role-name> |
31 | </security-role-ref> |
32 | <security-role-ref> |
33 | <role-name>power-user</role-name> |
34 | </security-role-ref> |
35 | <security-role-ref> |
36 | <role-name>user</role-name> |
37 | </security-role-ref> |
38 | </portlet> |
39 | </portlet-app> |
Now we will write the JSP and Java Controller with business logics.
JSPs as per folder you may put either inside or outside the /WEB-INF. Here I have mention outside the WEB-INF Below is the structure.

JSP createEmployee.jsp is a simple Action form , in which we are taking the Employee Details.
And when the Action is trigged Its search for the controller and map with the action param createEmployee. Once it land into the method it execute the business logic of the method.
Here is the EmployeeController.java Controller.
Inside the @ActionMapping we are getting all the params valus and setting them into the employee object
[Employee employee = new EmployeeImpl();]
Then we are calling the EmployeeLocalServiceUtil.addEmployee(employee); to add the Employee Details into database.
JSPs as per folder you may put either inside or outside the /WEB-INF. Here I have mention outside the WEB-INF Below is the structure.
JSP createEmployee.jsp is a simple Action form , in which we are taking the Employee Details.
01 | <%@ taglib uri="http://java.sun.com/portlet_2_0" prefix="portlet" %> |
02 | <%@ taglib uri="http://alloy.liferay.com/tld/aui" prefix="aui" %> |
03 | <portlet:defineObjects /> |
04 | <portlet:actionURL var="createEmployeeDetailURL"> |
05 | <portlet:param name="action" value="createEmployee" /> |
06 | </portlet:actionURL> |
07 | <aui:form action="<%=createEmployeeDetailURL %>" method="post" name="createEmp"> |
08 | <aui:layout> |
09 | <aui:fieldset> |
10 | <aui:column> |
11 | <aui:input type="text" name="firstName" label="First Name" /> |
12 | <aui:input type="text" name="LastName" label="Last Name" /> |
13 | <aui:input type="text" name="email" label="Email" /> |
14 | <aui:input type="text" name="phoneNo" label="Phone No" /> |
15 | <aui:button type="submit" value="Save" /> |
16 | </aui:column> |
17 | </aui:fieldset> |
18 | </aui:layout> |
19 | </aui:form> |
And when the Action is trigged Its search for the controller and map with the action param createEmployee. Once it land into the method it execute the business logic of the method.
Here is the EmployeeController.java Controller.
Inside the @ActionMapping we are getting all the params valus and setting them into the employee object
[Employee employee = new EmployeeImpl();]
Then we are calling the EmployeeLocalServiceUtil.addEmployee(employee); to add the Employee Details into database.
01 | package com.navin.example.action; |
02 |
03 | import javax.portlet.ActionRequest; |
04 | import javax.portlet.ActionResponse; |
05 | import javax.portlet.RenderRequest; |
06 | import javax.portlet.RenderResponse; |
07 |
08 | import org.springframework.stereotype.Controller; |
09 | import org.springframework.web.portlet.bind.annotation.ActionMapping; |
10 | import org.springframework.web.portlet.bind.annotation.RenderMapping; |
11 |
12 | import com.liferay.portal.kernel.exception.SystemException; |
13 | import com.liferay.portal.kernel.util.WebKeys; |
14 | import com.liferay.portal.theme.ThemeDisplay; |
15 | import com.navin.example.liferay.model.Employee; |
16 | import com.navin.example.liferay.model.impl.EmployeeImpl; |
17 | import com.navin.example.liferay.service.EmployeeLocalServiceUtil; |
18 |
19 | /** |
20 | * Portlet implementation class EmployeeController |
21 | * |
22 | * @author NavinAgarwal |
23 | * |
24 | */ |
25 | @Controller |
26 | public class EmployeeController { |
27 | |
28 | |
29 | @RenderMapping |
30 | public String createEmployee(RenderRequest request,RenderResponse response) { |
31 | return "createEmployee"; |
32 | } |
33 | |
34 | @RenderMapping(params = "redirectPage=welcome") |
35 | public String registration(RenderRequest request,RenderResponse response) { |
36 | return "welcome"; |
37 | } |
38 | |
39 | @ActionMapping(params = "action=createEmployee") |
40 | public void createEmployee(ActionRequest request,ActionResponse response)throws SystemException |
41 | { |
42 | ThemeDisplay themeDisplay = (ThemeDisplay) request.getAttribute(WebKeys.THEME_DISPLAY); |
43 | Employee employee = new EmployeeImpl(); |
44 | employee.setCompanyId(themeDisplay.getCompanyId()); |
45 | employee.setUserId(themeDisplay.getUserId()); |
46 | employee.setFirstName(request.getParameter("firstName")); |
47 | employee.setLastName(request.getParameter("LastName")); |
48 | employee.setEMail(request.getParameter("email")); |
49 | employee.setPhoneNo(request.getParameter("phoneNo")); |
50 | |
51 | EmployeeLocalServiceUtil.addEmployee(employee); |
52 | response.setRenderParameter("redirectPage", "welcome"); |
53 | request.setAttribute("EmployeeName",request.getParameter("firstName")+" "+request.getParameter("LastName")); |
54 | } |
55 | |
56 | } |
Tuesday, 15 January 2013
Spring MVC
The Spring web MVC framework provides model-view-controller architecture
and ready components that can be used to develop flexible and loosely
coupled web applications.
MVC:
continue.........
MVC:
- The Model encapsulates the application data and in general they will consist of POJO.
- The View is responsible for rendering the model data and in general it generates HTML output that the client's browser can interpret.
- The Controller is responsible for processing user requests and building appropriate model and passes it to the view for rendering
DispatcherServlet:
The Spring Web model-view-controller (MVC) framework is designed around a DispatcherServlet that handles all the HTTP requests and responses. The following diagram wll explain the flow.
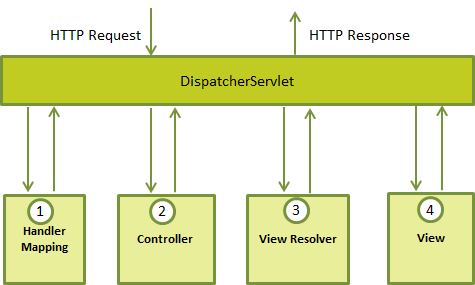
The User request will be sent to the DispatcherServlet. This will process the request as follows
- After receiving an HTTP request, DispatcherServlet consults the HandlerMapping to call the appropriate Controller.
- The Controller takes the request and calls the appropriate service methods based on used GET or POST method. The service method will set model data based on defined business logic and returns view name to the DispatcherServlet.
- The DispatcherServlet will take help from ViewResolver to pickup the defined view for the request.
- Once view is finalized, The DispatcherServlet passes the model data to the view which is finally rendered on the browser.
Next We will sea how we can define this with an example
Using URL mapping you need to map the request that the DispatcherServlet to handle.Following example shows how we can map.
<web-app id="WebApp_ID" version="2.4"
    xmlns="http://java.sun.com/xml/ns/j2ee"
    xmlns:xsi="http://www.w3.org/2001/XMLSchema-instance"
    xsi:schemaLocation="http://java.sun.com/xml/ns/j2ee
    http://java.sun.com/xml/ns/j2ee/web-app_2_4.xsd">

    <display-name>Spring MVC Application</display-name>

   <servlet>
      <servlet-name>HelloWeb</servlet-name>
      <servlet-class>
         org.springframework.web.servlet.DispatcherServlet
      </servlet-class>
      <load-on-startup>1</load-on-startup>
   </servlet>

   <servlet-mapping>
      <servlet-name>HelloWeb</servlet-name>
      <url-pattern>*.jsp</url-pattern>
   </servlet-mapping>

</web-app>
The web.xml file will be kept WebContent/WEB-INF directory of your web application. After initialization of DispatcherServlet , the framework will look for the application context from the file named [servlet-name]-servlet.xml located in the application's WebContent/WEB-INF directory by default.
If you want to give your own name for the application context file and if u want to place that file in some other location then by adding the servlet listener ContextLoaderListener in your web.xml file as follows:.
<web-app...>

<!-------- DispatcherServlet definition goes here----->
....
<context-param>
   <param-name>contextConfigLocation</param-name>
   <param-value>/WEB-INF/HelloWeb-servlet.xml</param-value>
</context-param>

<listener>
   <listener-class>
      org.springframework.web.context.ContextLoaderListener
   </listener-class>
</listener>
</web-app>
<beans xmlns="http://www.springframework.org/schema/beans"
   xmlns:context="http://www.springframework.org/schema/context"
   xmlns:xsi="http://www.w3.org/2001/XMLSchema-instance"
   xsi:schemaLocation="
   http://www.springframework.org/schema/beans
   http://www.springframework.org/schema/beans/spring-beans-3.0.xsd
   http://www.springframework.org/schema/context
   http://www.springframework.org/schema/context/
            spring-context-3.0.xsd">

   <context:component-scan base-package="com.examples" />

   <bean class="org.springframework.web.servlet.view.
              InternalResourceViewResolver">
      <property name="prefix" value="/WEB-INF/jsp/" />
      <property name="suffix" value=".jsp" />
   </bean>

</beans>
- The [servlet-name]-servlet.xml file will be used to create the beans defined, overriding the definitions of any beans defined with the same name in the global scope.
- The <context:component-scan...> tag will be use to activate Spring MVC annotation scanning capability which allows to make use of annotations like @Controller and @RequestMapping etc.
- The InternalResourceViewResolver will have rules defined to resolve the view names. As per the above defined rule, a logical view named hello is delegated to a view implementation located at /WEB-INF/jsp/hello.jsp .
DispatcherServlet delegates the request to the controllers to execute the functionality specific to it. The @Controller annotation indicates that a particular class serves the role of a controller. The @RequestMapping annotation is used to map a URL to either an entire class or a particular handler method.
@Controller
@RequestMapping("/hello")
public class HelloController{

   @RequestMapping(method = RequestMethod.GET)
   public String printHello(ModelMap model) {
      model.addAttribute("message",
 "Hello Spring MVC Framework!");
      return "hello";
   }

}
The @Controller annotation defines the class as a Spring MVC controller. Here, the first usage of @RequestMapping indicates that all handling methods on this controller are relative to the /hello path. Next annotation @RequestMapping(method = RequestMethod.GET) is used to declare the printHello() method as the controller's default service method to handle HTTP GET request. You can define another method to handle any POST request at the same URL.
You can write above controller in another form where you can add additional attributes in @RequestMapping as follows:
@Controller
public class HelloController{

   @RequestMapping(value = "/hello", method = RequestMethod.GET)
   public String printHello(ModelMap model) {
      model.addAttribute("message",
 "Hello Spring MVC Framework!");
      return "hello";
   }

}
The value attribute indicates the URL to which the handler method is mapped and the method attribute defines the service method to handle HTTP GET request. There are following important points to be noted about the controller defined above:
- You will defined required business logic inside a service method. You can call another methods inside this method as per requirement.
- Based on the business logic defined, you will create a model within this method. You can setter different model attributes and these attributes will be accessed by the view to present the final result. This example creates a model with its attribute "message".
- A defined service method can return a String which contains the name of the view to be used to render the model. This example returns "hello" as logical view name.
Creating JSP Views
Spring MVC supports many types of views for different presentation technologies. These include - JSPs, HTML, PDF, Excel worksheets, XML, Velocity templates, XSLT, JSON, Atom and RSS feeds, JasperReports etc. But most commonly we use JSP templates written with JSTL. So let us write a simple hello view in /WEB-INF/hello/hello.jsp:<html> <head> <title>Hello Spring MVC</title> </head> <body> <h2>${message}</h2> </body> </html>Here ${message} is the attribute which we have setup inside the Controller. You can have multiple attributes to be displayed inside your view.
continue.........
Subscribe to:
Comments (Atom)